If I Can Stand On It – It Should Be Fine

I wanted to cure the entire pot and give it nice oxide coat inside, but I also didn’t want to go through a whole take of propane. Looking at my kitchen stove, I was worried that a 25 gallon pot filled with water would break it. Then something crazy came to mind… If I could stand on the stove and it hold me, why wouldn’t it be able to hold my 25 gal pot full of water. I had to put it to test, but I only went for 20 gallons.

Based on my prior calculations and the pot size, for every 0.7″ of my pot, it yields 1 gallon. 1 gallon of water weighs approximately 8.35 lbs. Therefore, I would need to fill my pot with about 14″ of water to get 20 gal, and that amount should weigh about 167 lbs. That along with the 20 lb weight of the pot, brings my test to a total of 190 lbs approximately. I weigh smidge more than that, so again, why wouldn’t it work.

image

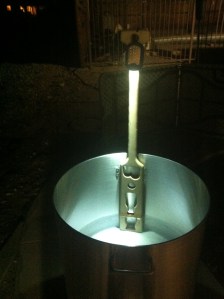
Now, with the pot on the stove and water added, time to boil. It took for-ev-er to bring it even close to boiling. It never actually boiled  but did end up getting a nice looking patina. You can see my 7.5 gal markings below the water line (the darker aluminum), now to get that on the entire pot.

Now here’s the dumb moment… One thing I failed to consider, was how the heck I would get the water out. At the end of my boil, I wasn’t thinking clearly and decided to try my auto-siphon. I now have a new one…yeah, it was too hot and ended up warping the plastic. I finally got it drain with my tubing portion, but I had to throw away the rest of the siphon.

Lesson Learned: Had I only thought of letting it cool first…duh!

Go Big Or Go Home

Since I was able to use Marks equipment, my brew days worked out well, but now I needed to start obtaining my own stuff. And what better way to go about it than to go big, right. I bought a 25 gallon, yes a Twenty-Five gallon aluminum stock pot. And yes, I am only doing 5 gallon batches. And no, that is not too big – 5 gallon batches work great in it. And the best part is you don’t have to worry too much about boil over.

I had struggled between using stainless steel $$$ or aluminum $. There are several posts on either side of the discussion, however I figured restaurants use them to cook food in, even acidic ones, so what’s the difference. I bought mine from Instawares.com.

Here’s a discussion about the two options that I found helpful…Aluminum Brew Pots v. Stainless Steel Brew Pots

Wow, this thing is huge. I did think how cool it would be to make a huge batch of mac n cheese. Then I just had to figure out the boil off rate, before I brewed – how many gallons of water does the increased surface area boil off.

Here’s how my test went. At the same time I decided to mark my mash paddle with measurements so I knew where I was at during my boil.

On the left is my 1 gallon and the right is 3 gallon. Barely looks like there is any water in there. It started getting dark…Light It Up!!!

image

My boil off test breakdown:

  • Outside Temp: 77 deg w/ 10mph wind
  • Boil Size: started with 7.5 gallons of 68 deg water
  • 170 deg at 23 min.
  • Boiling point (for my local) 206 at 43 min.
  • Started 60 min. boil countdown
  • 1/2 gal gone a 54 min.
  • Another 1/2 gal gone at 37 min.
  • Just a hair of 6 gal remaining at 30 min.
  • 5.5 gal left at 10 min.
  • 5 gal even at 0 min. (flame out)
It was too late to go through the cool down process, so I did just base my boil off rate at 2.5 gph. That proved to be a little high based on a brew day that followed. This was because during cool off, there still is loss of water.

Some Ideas Just Don’t Last

I took me only 24 hours of staring at my new DIY Cube Fermenter to realize that I just wasn’t satisfied enough. Costco also had this great deal on a 7 Cu. Ft. Chest Freezer that I just couldn’t pass up. I looked for used ones, but none were quite good enough. Besides I wanted to minimize my electricity usage and was hoping a newer freezer would be more energy efficient.

image

Shortly after, I found myself at a local hydroponics store, which has a nice little corner for homebrew, and I picked up a Johnson Temperature Control so I can keep the freezer around 64-68 degrees.

image

Then off to Costco I went and picked up the freezer. Once home, I immediately plugged it in and cranked it all the way down. I wanted to get my day and a half old brew in it right away. The great thing about the freezer is that I can fit 2 – 6 gallon carboys and a short 5 gallon carboy (top cut down), if I wanted. So ultimately that leaves me with 2 on tap, 1 aging in my kegerator, and 2 fermenting.  That can be a good flow.

image

Nice little setup going here….keep out!

image


Dual Wood Tap

I found my self at a Crate & Barrel that was closing, which sucked, but I came across  this set of Walnut Curtain Tie Backs (which was missing one), so I instantly thought it would be cool to try it as a tap handle.

With an oak table leg I picked up at Lowes, I attached them and blended them together..tada, another tap handle was done. I still haven’t stained/painted it – I’m kind of stuck as to what to do with it, it is a rather odd shape.

Black And Tan Tasting

2012 September

Time for another tasting… At this point I was out of Mr. Beer and finally got past the Ruination, so I decided to grab a few more. This time, ‘Tis the Season, I picked up some Octoberfest style and other seasonal beers.

Left Pic – From left to right: New Beldium’s Sommersault – I had tried their Belgo not too long before, on National IPA Day and liked it, so I thought I’d try their other styles; Sam Adams – because of popularity; Spaten (true German), Rumble – because I am obsessed with ‘smoked’ flavors and this was aged on oak chips (too piney tasting); Shock Top – I like their original and thought I’d try the October style; Widmer – I like Hef, so why not.

Right Pic – From left to right: Deschutes Mirror Pond – I had tried their Black Butte and really like it – I think I’m steering towards a Porter/Stout preference; Levitation – everyone said this would be something I like…don’t hate me yet, but it was ‘ok’; Sweetgrass and 1554 – not bad.

You may say, ‘what is he thinking’, but keep in mind, my tastes are changing daily and I’m liking more variety now that earlier in 2012.

Finally, next on my list was Black & Tan – I’ve always heard about it, but never new what it was or tried it. I was at World Market one day and saw this turtle thing, so I bought and it had all the varieties of mixtures as samples.

image

Essentially the turtle (or you can use a spoon), allows you to poor the Stout over the Pale ale and keep it separated. Let’s see how this works.

It was retty good, I like the combination, definitely the Guinness  however I think I would prefer a different Pale than Bass. I think though, that its more appealing to create than drink.

No More Closet Fermenting

2012 August
After a good brew day, you need to ferment – that’s basically the process of making alcohol. Living in a desert climate can be difficult to keep the wort between 64-70, without a little help. When I was brewing with Mr. Beer, it was early enough in the year that the closet maxed out at 75 – good enough for that type of brewing, however going to full 5 gallon batches, I needed something better.
I saw a post online about someone converting an ice chest (Igloo Cube) into a fermentation chamber, so my DIY kicked in again, and I just so happen to have the Cube on hand. I had already bought 2 – 5 gallon plastic carboys from MoreBeer, so I set one in the cooler to see what I was up against.

The instructions called for 1″ styrofoam, typically used to insulate garage doors…which I also happened to have just enough on hand. So far, no additional costs…looking good! I laid it all out, traced the cooler and began cutting. I cut out the middle to fit right over the rounded top of the carboy, then added 3 more layers, changing the hold size as it got taller.

image

My end result.  turned out well and looked really clean.

Now it was time to test, so I filled the carboy with water, put a water bottle with thermometer next to it, and let it sit. My goal was to maintain a constant temperature, regardless of the temp inside my garage. It succeeded for the most part and without adding any cooling I was at 75 deg, so my next thought was how do I cool it a little more. Considering, when the wort is fermenting, it is actually heating up – I knew this would result it me being more proactive and possibly adding frozen water bottles each day. I really did not want to  haved to do that.

Sitting in my garage, thinking, my eyes spotted this other ice chest I had that plugged into the car to keep sodas cold. Gears-a-moving, I thought again, can you guess where I’m going with this? I disassembled the cooler and found the cooling device (peltier cooling part) was attached to the aluminum casing. Since the Cube was plastic, I went and bought a strip of aluminum with the intent of attaching it to the peltier and some how sticking it inside the cube to cool.

My design came out really cool (no pun intended), and after getting the right power cord to convert ac/dc, I ran it for several days, starting out with 90 degree water. It finally cooled it all down to 75, however that wasn’t good enough.

 I then filled the Cube with water and thought that maybe if my aluminum strip was in water, it would transfer heat/cold better. It cooled it a bit more, but was still a little hokey. So, I called it a bust, and converted my lid back into a solid piece – just in time, since I was brewing that week. I just figured I’d keep replacing frozen water bottles within the Cube to keep it cool.
image

Sometimes Used Is Just As Good

2012 August

Now that I have a kegerator and plan to brew bigger batches than what Mr. Beer offers, I needed a keg. I spent hours researching kegs and trying to determine if I should buy new (at $100+) or used at ($50). The new ones are all stainless steel, shiny, no scratches or dents, and look very ‘purdy’. But, after long debate, I decided to get used and with most sellers they guarantee no leaks, however they don’t all clean or replace the o-rings.

On the day I received the keg, I took it out of the box and was actually very impressed with the condition it was in. One minor ding, several scratches and stickers, however it still looked good.

The funniest part of getting a used keg was that it still had diet Pepsi in it. With the family sitting around in the living room, I pull the release valve and POOF…diet Pepsi smell litterally filled house.

After sticker removal, wire brushing, and cleaning, the end result was an almost new looking, shiny ball lock cornelius keg. I replaced all the o-rings, except the poppet ones, which don’t come in the kits, but are sold separately. The basic reason for replacing is so that you don’t get any left over soda flavors in your beer.

image

I threw it in my kegerator to see how it fit, filled it with sanitizer and then just waited…I didn’t have any beer to put in it, darn it!

image

Custom Tap Handle

2012 July

Now, my friend Mark has two kegerators at home and in several discussions with him we both agreed the chalkboard tap handles sold online were really cool, however they run $39. Being a man of DIY, I said, I bet I can make one and thought I could on the cheap.

Hi-Ho, Hi-Ho, It’s off to Lowes I go… Down their wood isles I came across ‘table legs’. The gears started turning, so I started piecing some ideas together.

After sharing the ideas with Mark, he really liked this idea and said if I made it, he would buy it. And the dollar signs came falling from the sky like rain drops and ….not really, but it was definitely a fun concept to make and bunch of these and sell them.

My first draft, shown below, was pieced together using a trimmed table leg, square block that I routed the edges on, and a threaded insert into the bottom. Now, that specific insert was the first thing I saw at Lowes that would work…I didn’t bother looking further – at this point. Check out my later posts for the second ‘twin’ tap handle, to see a better insert…

Here comes the stain. Since Marks home bar is a darker wood, with a light red, I went with a Bombay Mahogany. This is only after the 2nd coat – 2 more and it would be dark enough.


Add the chalkboard paint and vuala..I now have a Chalkboard Tap Handle at only ‘an undisclosed’ cost, but definitely less than buying.

Better Than Bottling

2012 July

Mr. Beer Kits are only 2 gallons each…but still, after doing 3 or so of them, I was already tired/bored of bottling. I had been looking at kegerators for a few weeks and telling my friend that I wanted to get this specific dual tap one. Really my only justification was that this specific kegerator it had a blue led temp display.

After weighing the expense compared to the single tap they sell at Costco, I finally saved up enough and bought it. I also  thought I’d be smart and save on the $100 shipping cost, so I just happened to be in San Diego on business and picked it up from BeverageFactory. A Danby dual tap kegerator that can hold 3 homebrew kegs (15 gal) and a CO2 tank all inside.

image

After putting it all together and getting it setup, I had nothing to put in it. So..I filled milk cartons with sanitizer and then off to the store for a six pack.

I pulled out all the random beer glasses I managed to collect and lined them up. It looked so good, but so very dry still.


Homemade Mash Paddle

2012-July

Here is another example of me doing things ass-backwards. I didn’t even own any brew equipment at this point yet, other than Mr. Beer, and yet I am making a mash paddle.

A Mash paddle is used to stir the grains in water during the mash process (dough-in) and help break up dough balls. You know, when you pour flower into water and it clumps together.

None of the local hardware stores had decent wood, and with the financial situation in the US during this time, the local lumber yards have all shut down. After some research, I initially wanted Koa wood from Hawaii, and will still get it some day, however it runs over $30/ft. So, I went with hard maple. Yeah I could go with a plastic spoon or a stainless steel one that most brew stores sell, but I wanted to add something unique to my brewing process.

I’ve read several posts online for both sides of the argument, whether using wood is bad/good and decided its good enough. Besides, the wort is boiled after using it and wooden utensils have be used for centuries right.

I started out with roughly a 4′ long piece of hard maple. Stripped it down to about 4″ wide with a 1.5″ wide stem to handle. I routed the edges for a smooth hold.

I made the design on the computer and printed it out. Originally it looked like this (BC for my initials and a beer bottle pouring into a glass).

 image
However, after rushing to cut the inlays out, I drilled my holes in the wrong spot and ended up with just a B, then a ‘dot’, then the bottle and glass. I drilled another hole in the handle for hanging purposes and routed all the inside edges.
I was very happy with the results and that I didn’t have to pay $60 (the going rate for similar).